
CA-411 Floor Mounted Concealed Arm Lavatory Carrier - lavatory carrier
Build a barrage just below the upstream end of the diversion ditch. When the water backs up behind the barrage it will flow through the ditch, around the site and back to the stream. To prevent the water diverted downstream from flowing back into the site you may have to build another barrage below the weir.
You have released the float five times and have measured the time it takes to travel from AA to BB as 50, 47, 51, 48 and 54 seconds.
Drive a row of strong wood stakes into the stream bed along the line. Use a level to make sure the stakes are vertical. This row of stakes will help you to position the weir properly, whether it has been built on the bank before installation or built in place in the stream.
Find the head by placing a measuring stick, with the zero mark at the bottom, on top of the stake and reading the depth figure at the surface of the water.
NOTE: The accuracy of the water flow values decreases when head values are greater than one third of the crest length. Water values in this table are divided into three sections: white, darker and lighter grey. The values in the white section are the most accurate. In the other two sections, the accuracy decreases as the head increases toward a value equal to the crest length.
See how far the leaf floats during the time you are walking and estimate the water flow as shown in the examples.
Cover the joints between the wood boards or planks with strips of wood to prevent water leakage. After the weir has been built, you are ready to cut the notch in the upper edge.
Place the weir where the upstream water level (behind the weir) will not cause abnormal water losses by flooding the banks next to the stream, or water infiltration loss into the upper soil of the stream banks, which were not under water before. You must be particularly careful in flat countryside or where there are channels or ditches next to the stream that will be below the new water level behind the weir.
TekmarHouse Control 402 Manual
Place a straight board on the top of the bank. Make sure it is horizontal by using a mason's level. If the board is not horizontal, prop it up with stones until it is. Find the head by measuring downwards on both sides of the bank and taking the difference between the two measurements.
Your depth measurements were 0.2 m, 0.6 m. 0.9 m. 1.2 m, 0.8 m and 0.3 m: the deepest one is 1.2 m, so the average depth is 1.2 m � 2 = 0.6 m.
Your pipe inside diameter is about 25.4 cm and the head value is 19.5 cm; find this value on the left scale of Table 8 (diameter greater than 9 cm) and follow across until you reach the curve for a 25.4-cm pipe; follow vertically down to the bottom scale, where you find that the water flow is about 76 l/s.
Check to see that the weir is built properly and all requirements have been met, either for the triangular weir or for the rectangular weir.
But remember... The longer the time measurement, the less the number of measurements required; The longer the time measurement, the greater the difference between each figure will be.
Using the 1-litre container, count the number of litres needed to fill the buckets with water, in order to find how much each bucket will hold.
At point BB, the average depth is 0.8 m and the stream width is 2 m; the cross section at that point is thus 0.8 m x 2 m = 1.6 m2.
This is a method for measuring small to large water flow with medium accuracy. This method is best used in streams with calm water and during periods of good weather for if there is too much wind and the surface of the water is rough the float may not travel at the normal speed.
Calculate the water velocity (in m/s) by dividing the distance from AA to BB (in m) by the average time (in s).
Toilet Tank Anti-Sweat Valve · Mixes both the hot and cold water to reduce toilet tank sweating caused by condensation · 5/8" compression inlets and outlets ...
How you build and install a weir will depend on the speed of the water flow and the size of the stream.
Note: before you begin to build the weir, plan carefully in order to meet the above requirements of head, crest height and water drop. Be particularly careful about the stream width (if possible more than seven times the maximum water head) and the depth of the stream where you plan to install the weir. After the weir is built it will be difficult to change it.
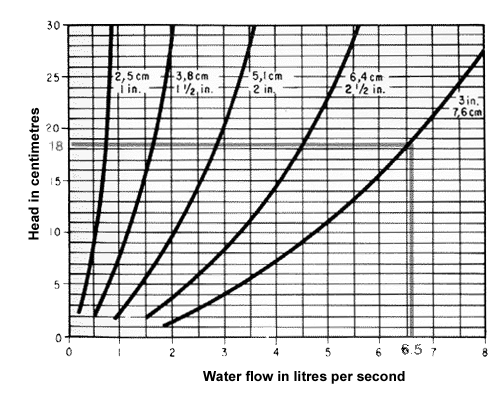
Your siphon has an inside diameter of approximately 5.1 cm; you have found that the head value is 21 cm; find this point on the left of the table and follow horizontally across until you reach the curve for a 5.1-cm siphon; follow vertically down to the bottom scale where you find that the water flow is about 2.5 l/s.
Your depth measurements at point AA were 0.6 m, 1.1 m. 1.4 m, 1.1 m and 0.8 m; their sum = 5.0 m; then the average depth at point AA is 5.0 m � 5 = 1 m.
Advantages: They allow for easy and accurate flow measurement; They are easy to build and require only little maintenance; small, floating debris will easily pass through the notch; They are durable.
Find the upstream point by measuring a distance above the weir that is a least 10 times the depth of the weir notch.
Hold a measuring stick, with the zero mark at the bottom, in the weir notch. The length of the measuring stick should be a bit longer than the notch is deep. Using a mason's level and straight board, transfer the height of the top of the measuring stick to the stake and mark it.
The type of rectangular weir discussed in this section has a rectangular notch with a crest length that is less than the width of the stream. All three edges of the notch must be sharp and no more than 3 mm thick.
If there is a slow water flow or the stream is small, you may choose to build the weir on the bank, where it is dry and easier to work, and install the weir in the flowing stream after it is finished.
If water flowing from a higher level to a lower level flows out of the pipe above the water line of the lower level, you can find the head by measuring the vertical distance (C.L) between the surface of the water above and the centre line of the pipe below.
For accurate measurement it is essential that your weir: Be built at a right angle (90�) to the direction of the water flow; Be placed exactly vertical at a 90� angle to the surface of the water. While you are installing a weir or building a weir in place, check this regularly.
Find a length along the stream that is straight for a distance of at least 20 metres. Try to find a place where the water is calm and free from water plants so the float will float easily and smoothly. Mark it with stakes on both sides of the stream at points AA and BB and stretch a line between the stakes.
Now you must find the average water velocity using a float as described in previous section 3.3. Have a friend put the float in the middle of the stream, a few metres upstream from line AA, and release it gently into the current. Stand at line BB and, using a watch, measure exactly the time (in seconds) it takes the float to travel the distance from AA to BB.
When you have found the head value, find the water flow using Table 9 for siphons with an inside diameter smaller than 9 cm, or Table 10 for siphons with an inside diameter larger than 9 cm. Do this by finding the head value (in cm) on the vertical scale of the table and follow horizontally across until you reach the curve that marks the correct size of siphon. Now look down to the bottom scale where you can read off the water flow (in l/s).
Drop a leaf in the water flow of the stream you want to measure. Walk in the direction the leaf is floating at a normal pace for about 30 metres or 35 paces.
Browse our selection of tankless water heaters from top brands including Bosch, Takagi, Stiebel Eltron, and more. Buy online for fast shipping and easy ...
It will be easier to record the measurements you take at points AA and BB if you prepare a small drawing as a record sheet to write them on.
Tekmar356
A weir should be installed in a channel that, upstream from the weir, is straight for a minimum distance at least 10 times greater than the length of the weir crest.
To obtain accurate water flow measurements with a rectangular weir, be sure that: The water head is greater than 5 cm; The crest length is at least 15 cm and should, preferably, be greater than three times the maximum water head to be measured; The crest height above the stream bottom upstream from the weir is greater than two to three times the head; The distance from the sides of the notch to the sides of the stream channel should be greater than two times the maximum water head to be measured; The water drop behind the weir is high enough so the water will fall free. Note: before you begin to build the weir, plan carefully in order to meet the above requirements of head, crest height and water drop. Be particularly careful about the stream width (if possible more than seven times the maximum water head) and the depth of the stream where you plan to install the weir. After the weir is built it will be difficult to change it.
Hanging bird feeder with ornamental bird - handmade metal art home garden deck patio decor native avian seed feeder bowl unique quality.
Now you can calculate the average time it has taken the float to travel from AA to BB. Add the three measurements and divide the sum by 3.
Tekmar741
To calculate the water flow (in m3) multiply the average water velocity (in m/s) by the average width (in m) and by the average depth (in m).
Use a rectangular weir if the stream flow to be measured: Does not vary greatly, and is generally greater than 114 l/s.
28 July 2024 — How do I calculate blood flow rate? · Divide the diameter of the vessel by 2 to obtain the radius. · Find the circular cross-sectional area using ...
Distance AA to BB = 20 m; your three time measurements are 59, 61 and 60 seconds; their sum is 180 seconds: the average time to travel from AA to BB is 180 � 3 = 60 seconds; surface water velocity is 20 m � 60 s = 0.33 m/s; average water velocity is 0.33m/s x 0.85 = 0.27 m/s.
Tekmar153
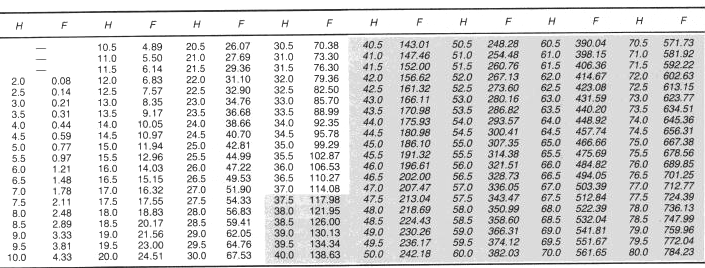
Your crest length is 60 cm and you have measured a head value (H) that is closest to 15 cm. To approximate the water flow for a 15-cm head you must average the difference between the water flow values (F found in Table 5 for H = 14 cm and H = 16 cm); for H = 16 cm, F = 66.89 l/s and for H = 14 cm, F = 55.13 l/s.
When the stream is large and you must build the weir in place, you will have to divert the water from the stream channel around the place where you will put the weir while you are building it.
To insure accurate water flow estimates using a weir you must maintain it regularly: Clean the weir and remove floating debris caught in the notch; Remove any silt that builds up on the upstream side of the weir; Control the erosion of the stream bottom on the downstream side of the weir; Check the alignment of the weir, both vertical (from the surface of the water) and perpendicular to the flow of the water; Check that the weir is watertight; Check that the zero mark on the upstream measuring stick is equal to the weir crest.
Note: remember that triangular weirs are best suited to measuring water flows of 114 l/s or smaller. When using Table 4, all values higher than F = 114.08 l/s and H =37 cm will become less and less accurate as H and F increase above these values.
Measure the width (in m) of the stream in a number of places. Take the measurement that occurs most frequently as the average width.
Note: when you are measuring the head at the upstream point, be careful not to disturb the water surface (by standing in the water, for example), which may make the head reading inaccurate.
If you have diverted the water from the channel to build the weir it will be easier to prepare this upstream point.
This is a method to estimate water flow through a relatively short, curved tube called a siphon, from an upper level to a lower level, and can be used, for example, when you fill or empty a pond. As with the pipe method just described, to use this method you will need to calculate the head (in cm).
When you have found the head value, find the water flow using Table 7 for pipes with an inside diameter smaller than 9 cm, or Table 8 for pipes with an inside diameter larger than 9 cm. Do this by finding the head value (in cm) on the vertical scale of the table and follow horizontally across until you reach the curve that marks the size of pipe you are using. Now look down to the bottom scale where you can read off the water flow (in l/s).
How to construct a 90� triangular notch in wood: Find the centre point on the top edge of the weir; On each side of the centre point, measure and mark a distance equal to the depth of the notch (say 30 cm) you will use; At the centre point, draw a right angle line downwards, equal in length to the depth of the notch; Connect the end of this line with the two marks on the top edge of the weir. You have constructed a right angle (90�) triangular notch;
Remove the measuring stick from the notch, place it beside the stake and tie the top of it to the stake, even with this mark. Check to see that the weir is built properly and all requirements have been met, either for the triangular weir or for the rectangular weir. Find the head by reading the depth figure on the measuring stick at the surface of the water.
The constant water level at the upstream measuring point is closest to 23.5 cm; this is the head value on the weir. Using Table 4, you find that, for a head value of 23.5 cm, the water flow = 36.68 l/s.
To increase accuracy, place the weir at the lower end of a long pool sufficiently wide and deep for the water flow to approach the weir slowly, regularly and without any eddies.
Adding these two F-values and dividing the result by two: 66.89 + 55.13 = 122.02 � 2 = 61.01 l/s or say 61 l/s which is the corrected water flow value for a 15-cm head.
After the weir has been well installed in the banks and bottom of the stream, you can remove the vertical stakes if the weir needs no additional bracing. If the water flow is strong and additional bracing is needed, remove only the stakes behind the notch.
Ask a friend to place the float in the middle of the stream, a few metres upstream from line AA, and to release it gently into the current. Stand at line BB and using a watch, measure exactly the time (in seconds) it takes the float to travel the distance from AA to BB.
Repeat this measurement three times. Place the float in the water and note how long it takes to travel the distance from AA to BB three different times.
When the water has been diverted and the site is dry, you can begin to build the weir in place. After the weir is finished, remove the barrages and let the water back in the stream channel. It will soon reach its constant level and begin to flow through the notch.
The leaf floats as fast as you walk (30 m); the stream is 30 cm wide and 15 cm deep; this stream will supply 20000 m3 of water in about one week.
Your actual crest length is 110 cm and you have measured a head value that is closest to 34 cm. The column where the crest length is smaller than 110 cm is 90 cm, with a water flow value of 303.50 l/s. Following the same line, the water flow value in the 10-cm column is 34.40 l/s. The difference between the actual crest length and the crest length in the table is 110 cm - 90 cm = 20 cm. The number of additional 10-cm lengths is 20 � 10 = 2. Then the additional flow due to this is 34.40 x 2 = 68.80 l/s. The correct water flow value for the actual crest length of 110 cm is 303.50 l/s + 68.80 l/s = 372.30 l/s.
22 Aug 2021 — This calculator has inputs for temperature (℃), depth (m)/pressure (kPa), and salinity (ppt), and outputs the speed of sound in water.
When you estimate water flow using a rectangular weir, the error will tend to increase as the head decreases. Under field conditions, if you have fulfilled the requirements listed, the error will generally be limited to 10 percent. In a rectangular weir, if you want to further decrease the error you can reduce the crest length, within the limits stated above which will increase the head. Table 5 may help you to do this. The following notch depths and crest lengths (in cm) are required for the water flow range values shown: 30 x 60 cm, flow 80 to 120 l/s; 40 x 90 cm, flow 120 to 300 l/s; 55 x 120 cm, flow 300 to 600 l/s; 75 x 180 cm, flow 600 to 1500 l/s.
Note: if there is a fast water flow or the stream is large, you may choose to build the weir in place in the stream. The larger the stream, the larger the weir will have to be; it may turn out to be too large and heavy to build it on the bank and place it in the stream after it is finished.
The leaf floats half the distance (15 m); the stream is 20 cm wide and 10 cm deep in the centre; this stream can supply 2500 m3 of water in one week.
Note: potassium permanganate and fluorescein are suitable dye solutions that may be available from chemical suppliers.
The thickness of the wood you should use will depend on the width of the stream and the force of the water flow. For a very small stream you can use light wood, but for a large and fast stream you will need to use heavy wood or timber.
If you find that your water requirements are no greater than those seen in the examples, you do not need to make any more water flow measurements.
How to construct a rectangular notch in wood: Find the centre point on the top edge of the weir; On each side of the centre point, measure and mark a distance equal to half of the crest length, say 30 cm (crest length 60 cm), you will use; At each of these two marks, draw a right angle line downwards equal in length to the depth of the notch; Connect the ends of these two lines. You have constructed a rectangular notch;
Weirs are commonly used to measure small and large water flow with high accuracy. They are especially useful for recording water flow over a period of time.
A weir is an obstruction placed across a stream that forces all the water to flow through a notch in the weir. There are weirs of many types and designs. In this section we will discuss two types, the triangular weir and the rectangular weir.
To obtain accurate water flow measurements with a triangular weir, be sure that: The water head is greater than 5 cm; The crest height, above the stream bottom upstream from the weir, is greater than two to three times the head; The water drop behind the weir is high enough to create a sufficient vertical drop so the water will fall free.
Corrugated sheeting is usually easy to find in large sheets and much less expensive than sheet metal.
When you estimate water flow using a triangular weir, the error will tend to increase as the head decreases. Under field conditions, if you have fulfilled the requirements listed, the error will generally be limited to 10 percent. In a triangular weir, if you want to decrease the error further you can increase the notch depth, within the limits stated above, which will increase the head. The following notch depths (in cm) are required for the sizes of water flow (in l/s) shown: 20 cm, flow less than 15 l/s; 30 cm, flow 15 to 45 l/s; 40 cm, flow 45 to 65 l/s; 50 cm, flow 65 to 110 l/s.
To define notch dimensions for a rectangular weir other than those shown above, you can use the white upper part of Table 5. Locate the maximum water flow (in l/s) to be measured, keeping the crest length (in cm) as small as possible. Read horizontally the corresponding head (in cm) and add 10 to 15 cm to find the notch depth you should use.
Tekmar743
AA to BB = 10 metres; Average time = 20 seconds; Surface water velocity = 10 m � 20 s or 10 � 20 m/s= 0.5 m/s Average water velocity = 0.5 m/s x 0.85 = 0.425 m/s.
A weir must be placed or built in the stream in a vertical position and on a line across the stream perpendicular to the water flow. Mark the position you have chosen for the weir by stretching a line across the stream from bank to bank at a right (90�) angle to the water flow. Drive a row of strong wood stakes into the stream bed along the line. Use a level to make sure the stakes are vertical. This row of stakes will help you to position the weir properly, whether it has been built on the bank before installation or built in place in the stream.
Note: to find the time it will take to fill or empty a pond using a straight pipe or a siphon, see Sections 3.7 and 3.8.
These valves automatically feed water to a system whenever pressure in the system drops below the pressure setting of the valve. The dual control combines the ...
Use a triangular weir if the stream flow to be measured: Does not vary greatly from season to season and is generally smaller than 114 l/s; Does vary greatly from small to large flow or large to small flow. Use a rectangular weir if the stream flow to be measured: Does not vary greatly, and is generally greater than 114 l/s.
The head of the weir is the vertical distance from the weir crest to the undisturbed upstream water surface.
Average water velocity 0.27 m/s; Average cross section 1.8 m2 ; Water flow = 0.27 m/s x 1.8 m2 = 0.486 m3/s
To measure the head, or the constant upstream water level equivalent at the weir, you will have to transfer a point equal to the crest height at the weir to another point upstream where the water level will be constant. Find the upstream point by measuring a distance above the weir that is a least 10 times the depth of the weir notch.
When you are installing a weir that has either been built on the bank, or is being built in place in the stream where the water has not been diverted, position the weir on the upstream side of the vertical stakes so that the flow of the water holds the weir in the correct position against the stakes. After the weir has been well installed in the banks and bottom of the stream, you can remove the vertical stakes if the weir needs no additional bracing. If the water flow is strong and additional bracing is needed, remove only the stakes behind the notch.
A siphon can be made from a length of rubber or plastic tube that is long enough and pliable enough to reach over the bank from the upper water level to the lower water level.
TABLE 4 Water flow estimates using a triangular or V-notch weir (H = Head in centimetres; F = Water flow in litres per second) NOTE: The grey section is less accurate.
Another way to find the head is to drive a stake into the bank on each side. Put the stakes in the water a little out from the edge of the bank. Using a line level, tie a string between the two stakes in a horizontal position. Find the head by measuring downwards on both sides of the bank and taking the difference between the two measurements.
Tekmar402
To calculate the water flow (in m3/s) multiply the average water velocity by the average cross-section.
The following notch depths (in cm) are required for the sizes of water flow (in l/s) shown: 20 cm, flow less than 15 l/s; 30 cm, flow 15 to 45 l/s; 40 cm, flow 45 to 65 l/s; 50 cm, flow 65 to 110 l/s.
Time for front of dye stain (t1) to reach line BB = 95 seconds Time for end of dye stain (t2) to reach line BB =105 seconds Total time: 95 + 105 = 200 seconds. Average time: 200 � 2 =100 seconds.
Note: you can increase the accuracy of this method if you increase the distance from A to B to 30 m, 50 m or even 100 m. A greater distance between A and B is especially recommended if the stream is fast flowing. The faster the water flow, the greater the distance should be. Note: you can also increase the accuracy of this method if you increase the number of time measurements to 5, 7 or even 10.
When the dam is about half built, put in a pipe about 5-7 cm in diameter and about 1-1.5 m long. This pipe can be made of bamboo.
For a pipe below water line, measure the distance from the horizontal to the surface of the water (AB) on the upper level; measure the distance from the horizontal to the surface of the water (CD) on the lower level; the head is CD-AB.
The following notch depths and crest lengths (in cm) are required for the water flow range values shown: 30 x 60 cm, flow 80 to 120 l/s; 40 x 90 cm, flow 120 to 300 l/s; 55 x 120 cm, flow 300 to 600 l/s; 75 x 180 cm, flow 600 to 1500 l/s.
If the water flow is more than the largest water flow figure shown above (110 I/s) you will have to approximate the required notch depth. Using Table 4, find the head (in cm) corresponding to the maximum water flow (in I/s) to be measured and add about 10 cm to the head value to obtain the corrected notch depth.
This is a simple method for measuring small to large water flow with an accuracy somewhat greater than the float method described in Section 3.3. Like the float method, it is best used in calm water and during periods of good weather when there is little wind. You will need to prepare a float as you were shown in the previous section.
Note: if a weir made of sheet metal needs additional bracing, leave the vertical stakes you have put in the stream to mark the position of the weir, but be sure to remove those stakes in front of the notch.
The cross-section of the stream will be different at the beginning (AA) and the end (BB). You will need to find the average cross-section.
Cross-section at point AA = 2.0 m2 Cross-section at point BB = 1.6 m2 Total (AA + BB) = 3.6 m2 Average cross-section = 3.6 m2 � 2 = 1.8 m2.
Length of AA to BB = 20 m. Average time = 100 s. Water velocity = 20 m � 100 s = 0.2 m/s
Repeat the measurement at least three times and calculate the average time by adding all the measurements and dividing by the number of measurements you have taken. Now divide the distance from AA to BB by the average time to find the surface velocity of the water, and multiply this by 0.85 (a correction factor) to estimate the average water velocity.
The level of the water actually passing over the crest of the weir will not be as high as the water level upstream because, as water flows closer to the weir, the level begins to drop before it flows over the crest.
Find at least two buckets or other, similar containers which you can use to catch the water flowing through the pipe. You will also need a bottle or other, smaller 1-litre container.
Your pipe has an inside diameter of approximately 7.6 cm; you have found that the head value is 18 cm; find this value on the left scale of Table 7 (diameter smaller than 9 cm) and follow across until you reach the curve for a 7.6-cm pipe; follow vertically down to the bottom scale, where you find that the water flow is 6.5 l/s.
Mueller Steam Specialty is a recognized leader in the pipeline strainer and valve industry, such as Y-strainers, Simplex Strainers, Duplex Strainers, Temporary ...
To prevent the water diverted downstream from flowing back into the site you may have to build another barrage below the weir.
When you cut a notch in sheet metal be careful that the edges are straight and sharp. You might ask the local blacksmith to help.
A weir is used to determine water flow by measuring the head, or the difference between the level of the crest of the weir and the water level upstream from the weir.
Measure the water depth (in m) of the stream at several points along its width. Take half of the deepest measurement as an approximation of the average depth.
A good float may be a piece of wood or a smooth tree branch about 30 cm long and 5 cm wide or a small well- capped bottle 10 cm tall, containing enough matter (such as water, soil or pebbles) so that, when it floats in the stream, the top of the bottle is just above the surface.
With a very small stream, a weir that has been built on the bank can be installed by pounding it into place or digging it into the sides and bottom of the stream while the water is flowing. Note: if there is a fast water flow or the stream is large, you may choose to build the weir in place in the stream. The larger the stream, the larger the weir will have to be; it may turn out to be too large and heavy to build it on the bank and place it in the stream after it is finished.
We have seen previously that triangular weirs are generally used for measuring small water flows while rectangular weirs are used for measuring large water flows. For this reason, measure the head in a triangular weir with a measuring stick graduated in half -centimetres and the head in a rectangular weir with a measuring stick graduated in centimetres. Note: when you are measuring the head at the upstream point, be careful not to disturb the water surface (by standing in the water, for example), which may make the head reading inaccurate.
Note: before you begin to build the weir, plan carefully in order to meet the above requirements of head, crest height and water drop. Be particularly careful about the stream width (if possible more than seven times the maximum water head) and the depth of the stream where you plan to install the weir. After the weir is built it will be difficult to change it.
For a pipe above water line, measure the distance from the horizontal to the surface of the water (AB) on the upper level; measure the distance from the horizontal to the centre line of the pipe (CD) on the lower level; the head is CD-AB.
The leaf floats half of the distance (15 m); the stream is 30 cm wide and 15 cm deep in the centre; this stream can supply 10000 m3 of water in about one week. The leaf floats as fast as you walk (30 m); the stream is 30 cm wide and 15 cm deep; this stream will supply 20000 m3 of water in about one week.
Let us compare various methods. Table 3 will help you to compare various methods and to select the one best suited to your needs. Each of these methods is fully explained and illustrated in the following sections.
Tekmar444
The crest of a weir is the bottom edge of the weir notch. In a rectangular weir the crest length is the width of the notch. In a triangular (or V-notch) weir the crest length is zero.
Each of your buckets holds 10 litres; you collect 9 buckets in 1 minute; the total water flow in 1 minute is 10 l x 9 = 90 l; 1 minute = 60 seconds; total water flow in 1 second is 90 l � 60 s = 1.5 l/s.
Disadvantages: They require considerable head-loss for proper operation; Large pieces of floating debris can become caught in the notch and change the water flow; Changes in flow can occur, for example, if debris becomes caught in the weir, silt builds up behind the weir, etc.
Note: when you use a dye stain you do not have to multiply the water velocity by a correction factor as you do when using a float.
The crest length of your weir is 30 cm and you have found that the head value is 10 cm; find this last value on the left scale of the table and follow the line across until you reach the crest length column for 30 cm (note that this is still in the upper section of the table where water flow values are most accurate); you find that the water flow value is 16.29 l/s.
Find and mark a length AA to BB along the stream, which is straight for a distance of at least 10 metres. Try to find a place where the water is calm and free from water plants so the float will flow easily and smoothly.
You have measured the time it takes for the float to travel from AA to BB as 15, 21 and 20 seconds; 15 seconds is much less than the other measurements; take another measurement and use this number instead of 15.
Tekmar356 Mixing Control Manual
Drop a small amount of dye in the middle of the stream a little above line AA. This will form a dye stain in the water. Note: potassium permanganate and fluorescein are suitable dye solutions that may be available from chemical suppliers.
Measure the distance from the horizontal to the surface of the water (AB) on the upper level; measure the distance from the horizontal to the surface of the water (CD) on the lower level; the head is the difference between the two, or CD-AB.
1With full end contractions and sharp edges. 2Approximate water flow for each additional 10 cm of weir crest (for crest lengths of 30 cm or longer and for values in the unshaded upper part of the table only).
The maximum water flow to be measured is 250 l/s. Using Table 5 you find that 253.97 l/s is the closest to 250 l/s in the most accurate, or upper, part of the table, and with the smallest crest length = 90 cm. This water flow value corresponds to a head value of 30 cm. Then the notch depth should be 30 cm + 10 cm = 40 cm. The notch size you should use is 40 cm (depth) x 90 cm (width).
The stake should be tall enough to remain above the surface when the level of the water reaches its maximum height.
Note: you can also increase the accuracy of this method if you increase the number of time measurements to 5, 7 or even 10.
2024927 — Add an Underground Drainage Pipe. One of the best ways to get rid of water from a low spot is to simply drain it away through an underground ...
This is a method for measuring small and large water flow with medium accuracy. In this method, water-staining dye is used instead of a float to measure the water flow.
In both the triangular and the rectangular weir the notch used has sharp edges so the water flowing over the weir will touch only a fine line and the notch width is smaller than the stream width (contracted weir).
Now let the water flow back into the channel. Be sure to close the diversion ditch so that when the level rises behind the weir no water will be lost in channels or ditches or by infiltrating or flooding (see p. 63). When the constant upstream level has been reached, the top of the stake will be under water. Check to see that the weir is built properly and all requirements have been met. either for the triangular weir; or for the rectangular weir. Find the head by placing a measuring stick, with the zero mark at the bottom, on top of the stake and reading the depth figure at the surface of the water.
TABLE 3 Water flow measurement methods for streams or canals Section Method Water flow Accuracy Remarks Equipment 3.1 * Quick and rough Small An approximation For a quick estimate None 3.2** Bucket Very small Very high Most accurate of all methods Dam, pipe, buckets, 1 -l bottle, watch 3.3** Float Small to large Medium Best for streams with calm water Float, stakes, line, measuring stick, watch 3.4** Float and cross section Low to medium Float, stakes, line, measuring stick, record sheet, watch 3.5** Dye, stain and cross section Dye, stakes, line, measuring stick, record sheet, watch 3.6*** Weir, triangular Does not vary greatly, 114 l/s or smaller, or does vary greatly from small to large High For recording flow over a period of time Wood, sheet metal or corrugated roof sheeting; tools for working with wood or metal; shovel, pick, line, level, measuring stick Weir, rectangular Does not vary greatly and is greater than 114 l/ s NOTE: * very simple; ** more difficult; *** most difficult.
The Mixing Control 360 is designed to operate a mixing valve using Outdoor Temperature Reset. It can be used in applications ranging from in-floor radiant to commercial baseboard systems for Boiler Return Protection with full reset. This control regulates a single heating water temperature through Mixing Outdoor Reset. It controls the mixing by opening or closing a floating action type mixing valve actuator (3 or 4 way valves), and also provides control of the mix system pump.
Note: if one of the three measurements is greatly different from the other two, take a fourth measurement and use this one.
You can build a weir of close-fitting wood boards or planks held together by upright pieces of wood on both sides.
Protein. WD repeat-containing protein 75 · Gene. WDR75 · Status. UniProtKB reviewed (Swiss-Prot) · Organism. Homo sapiens (Human) · Amino acids. 830 (go to sequence).
Drive a stake into the stream bottom near the bank at the upstream point you have selected. The stake should be tall enough to remain above the surface when the level of the water reaches its maximum height.
Why Invest in Watts Water Technologies? · Leader in Residential / Commercial Water Products · Large Addressable Market with Exposure to Diverse End Markets.
Your three time measurements are 19, 21 and 20 seconds; their sum is 19 + 21 + 20 = 60 sec; the average time to travel from AA to BB is 60 � 3 = 20 seconds.
A siphon will function only when there is a difference in the two water levels and the end of the tube at the lower level is below the end of the tube immersed in the water at the upper level.
If the crest length of your weir is greater than 30 cm and is not listed in Table 5 (e.g., 40, 50, 70 and 80 cm), you can calculate the water flow value by using the 10-cm column, at the right of the table, and by following the steps as in the next example below. Find the head value in the right-hand column of the table. Find both the water flow value shown in the column where the crest length is smaller than the actual crest length of the weir you are using and the water flow value in the 10-cm column. Calculate the number of additional 10-cm lengths the actual weir crest has, compared with the smaller crest length you have found in the table. Now multiply the water flow value found in the 10-cm column by this number and add the result to the water flow value corresponding to the smaller crest length. The result is the corrected water flow value for the actual crest lengt.
The constant water level at the upstream measuring point is closest to 34 cm; this is the head value on the weir. Using Table 4, you find that, for a head value of 34 cm, the water flow = 92.35 l/s.
When a weir is in place across the stream it raises the upstream water level. To be efficient, a weir should create a sufficient vertical drop between the notch bottom and the downstream water surface. In such a case, the water will fall free, and air can circulate beneath the water as it overflows. The crest of a weir is the bottom edge of the weir notch. In a rectangular weir the crest length is the width of the notch. In a triangular (or V-notch) weir the crest length is zero. The head of the weir is the vertical distance from the weir crest to the undisturbed upstream water surface.
Check to see that the weir is built properly and all requirements have been met. either for the triangular weir; or for the rectangular weir. Find the head by placing a measuring stick, with the zero mark at the bottom, on top of the stake and reading the depth figure at the surface of the water.
Using one bucket after the other, catch all the water flowing through the pipe for 1 minute (60 seconds). Count how many buckets you can fill during that time. Calculate the total water flow (in l/s).
The thickness and strength of the sheet metal you will have to use will depend on the speed of the water flow and the size of the stream.
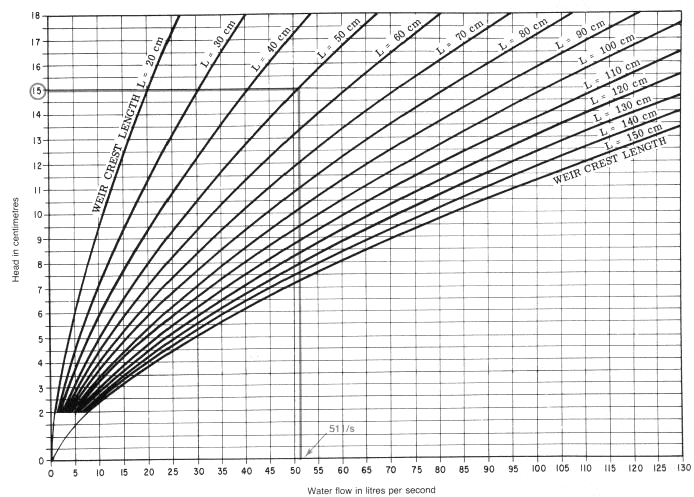
The crest length of your weir is 50 cm and you have found that the head value is 15 cm; find the head on the left scale of the table and follow the horizontal line across until you reach the curve for a crest length of 50 cm; from this point follow vertically down to the bottom scale of the table. You will find that the water flow is about 51 l/s.
A triangular weir or V-notch weir has a notch that is a right or 90� angle. Both edges of the notch must be sharp and no more than 3 mm thick.
Note: you can increase the accuracy of this method if you increase the distance from AA to BB or increase the number of time measurements as described in the previons section.
This is a very simple method to measure approximate water flow in very small streams. You do not need any special equipment for this estimate.
Water velocity = 0.2 m/s Average cross-section = 1.8 m2 Water flow = 0.2 m/s x 1.8 m2 = 0.36 m3/s or 0.36 m3/s x 1 000 = 360 l/s
This is a method to estimate water flow through a relatively short, straight pipe, from a higher level to a lower level, and can be used, for example, when you fill or empty a pond. To use this method you will have to find the head (in cm). If water flowing from a higher level to a lower level flows out of the pipe above the water line of the lower level, you can find the head by measuring the vertical distance (C.L) between the surface of the water above and the centre line of the pipe below.
There are a number of good ways to measure the amount of water in a stream or a canal. What method of measurement you should use will depend on several factors: The accuracy of the result needed; The quantity of water present in the stream or canal you will measure; The equipment you have available to use. Let us compare various methods. Table 3 will help you to compare various methods and to select the one best suited to your needs. Each of these methods is fully explained and illustrated in the following sections. Note: to find the time it will take to fill or empty a pond using a straight pipe or a siphon, see Sections 3.7 and 3.8. TABLE 3 Water flow measurement methods for streams or canals Section Method Water flow Accuracy Remarks Equipment 3.1 * Quick and rough Small An approximation For a quick estimate None 3.2** Bucket Very small Very high Most accurate of all methods Dam, pipe, buckets, 1 -l bottle, watch 3.3** Float Small to large Medium Best for streams with calm water Float, stakes, line, measuring stick, watch 3.4** Float and cross section Low to medium Float, stakes, line, measuring stick, record sheet, watch 3.5** Dye, stain and cross section Dye, stakes, line, measuring stick, record sheet, watch 3.6*** Weir, triangular Does not vary greatly, 114 l/s or smaller, or does vary greatly from small to large High For recording flow over a period of time Wood, sheet metal or corrugated roof sheeting; tools for working with wood or metal; shovel, pick, line, level, measuring stick Weir, rectangular Does not vary greatly and is greater than 114 l/ s NOTE: * very simple; ** more difficult; *** most difficult. 3.1 Quick rough estimate This is a very simple method to measure approximate water flow in very small streams. You do not need any special equipment for this estimate. Drop a leaf in the water flow of the stream you want to measure. Walk in the direction the leaf is floating at a normal pace for about 30 metres or 35 paces. See how far the leaf floats during the time you are walking and estimate the water flow as shown in the examples. Examples The leaf floats half the distance (15 m); the stream is 20 cm wide and 10 cm deep in the centre; this stream can supply 2500 m3 of water in one week. The leaf floats half of the distance (15 m); the stream is 30 cm wide and 15 cm deep in the centre; this stream can supply 10000 m3 of water in about one week. The leaf floats as fast as you walk (30 m); the stream is 30 cm wide and 15 cm deep; this stream will supply 20000 m3 of water in about one week. If you find that your water requirements are no greater than those seen in the examples, you do not need to make any more water flow measurements. If you find that your water requirements are greater than those seen in the examples, you should use one of the more accurate methods to measure the water flow so you will be sure that you have sufficient water available. 3.2 Bucket method This is a simple method for measuring a very small flow of less than 5 l/s with very high accuracy. Begin to build a small dam of earth across the stream to stop the flow. You can use wood poles, bamboo or tree branches to hold the earth in place while you build the dam. When the dam is about half built, put in a pipe about 5-7 cm in diameter and about 1-1.5 m long. This pipe can be made of bamboo. Finish building the dam across the stream so that all the water flow passes through the pipe. Find at least two buckets or other, similar containers which you can use to catch the water flowing through the pipe. You will also need a bottle or other, smaller 1-litre container. Using the 1-litre container, count the number of litres needed to fill the buckets with water, in order to find how much each bucket will hold. Example You need 10 1-litre containers to fill a bucket, so it holds 10 litres. Using one bucket after the other, catch all the water flowing through the pipe for 1 minute (60 seconds). Count how many buckets you can fill during that time. Calculate the total water flow (in l/s). Example Each of your buckets holds 10 litres; you collect 9 buckets in 1 minute; the total water flow in 1 minute is 10 l x 9 = 90 l; 1 minute = 60 seconds; total water flow in 1 second is 90 l � 60 s = 1.5 l/s. 3.3 Float method This is a method for measuring small to large water flow with medium accuracy. This method is best used in streams with calm water and during periods of good weather for if there is too much wind and the surface of the water is rough the float may not travel at the normal speed. Prepare a float A good float may be a piece of wood or a smooth tree branch about 30 cm long and 5 cm wide or a small well- capped bottle 10 cm tall, containing enough matter (such as water, soil or pebbles) so that, when it floats in the stream, the top of the bottle is just above the surface. Where to measure Find and mark a length AA to BB along the stream, which is straight for a distance of at least 10 metres. Try to find a place where the water is calm and free from water plants so the float will flow easily and smoothly. Find the average water velocity Ask a friend to place the float in the middle of the stream, a few metres upstream from line AA, and to release it gently into the current. Stand at line BB and using a watch, measure exactly the time (in seconds) it takes the float to travel the distance from AA to BB. Repeat this measurement three times. Place the float in the water and note how long it takes to travel the distance from AA to BB three different times. Note: if one of the three measurements is greatly different from the other two, take a fourth measurement and use this one. Example You have measured the time it takes for the float to travel from AA to BB as 15, 21 and 20 seconds; 15 seconds is much less than the other measurements; take another measurement and use this number instead of 15. Now you can calculate the average time it has taken the float to travel from AA to BB. Add the three measurements and divide the sum by 3. Example Your three time measurements are 19, 21 and 20 seconds; their sum is 19 + 21 + 20 = 60 sec; the average time to travel from AA to BB is 60 � 3 = 20 seconds. Find the surface water velocity (in m/s) by dividing the distance from AA to BB (in this example, 10 m) by the average time (in seconds) and multiply this result by 0.85 (a correction factor) to estimate the average water velocity of the stream. Example AA to BB = 10 metres; Average time = 20 seconds; Surface water velocity = 10 m � 20 s or 10 � 20 m/s= 0.5 m/s Average water velocity = 0.5 m/s x 0.85 = 0.425 m/s. Find the average width Measure the width (in m) of the stream in a number of places. Take the measurement that occurs most frequently as the average width. Example Your width measurements were 1.1 m, 1 m, 1 m, 0.9 m, 1 m and 1.2 m; use 1 m for the average width. Find the average depth Measure the water depth (in m) of the stream at several points along its width. Take half of the deepest measurement as an approximation of the average depth. Example Your depth measurements were 0.2 m, 0.6 m. 0.9 m. 1.2 m, 0.8 m and 0.3 m: the deepest one is 1.2 m, so the average depth is 1.2 m � 2 = 0.6 m. Calculate the water flow To calculate the water flow (in m3) multiply the average water velocity (in m/s) by the average width (in m) and by the average depth (in m). Example Water flow = 0.425 m/s x 1 m x 0.6 m = 0.255 m3/s. Note: remember that 1 m3 = 1 000 l so multiply by this to convert water flow measurements to litres per second (l/s). Example Water flow = 0.255 m3/s x 1 000 l = 255 l/s. 3.4 Float and cross-section method This is a simple method for measuring small to large water flow with an accuracy somewhat greater than the float method described in Section 3.3. Like the float method, it is best used in calm water and during periods of good weather when there is little wind. You will need to prepare a float as you were shown in the previous section. Where to measure Find a length along the stream that is straight for a distance of at least 20 metres. Try to find a place where the water is calm and free from water plants so the float will float easily and smoothly. Mark it with stakes on both sides of the stream at points AA and BB and stretch a line between the stakes. Find the average cross-section The cross-section of the stream will be different at the beginning (AA) and the end (BB). You will need to find the average cross-section. Measure the water depth (in m) five times at equal distances across the stream at point AA. It will be easier to record the measurements you take at points AA and BB if you prepare a small drawing as a record sheet to write them on. When you have taken all the measurements at point AA, add the five depth figures and divide by 5 to find the average water depth at AA. Example Your depth measurements at point AA were 0.6 m, 1.1 m. 1.4 m, 1.1 m and 0.8 m; their sum = 5.0 m; then the average depth at point AA is 5.0 m � 5 = 1 m. The cross-section (in m2 ) at point AA is the average depth multiplied by the width of the stream. Example The stream width at point AA is 2 m; the cross section at that point is thus 1 m x 2 m = 2 m2. Now take measurements at point BB as you did at point AA to find the average depth, stream width and cross- section at BB. Example At point BB, the average depth is 0.8 m and the stream width is 2 m; the cross section at that point is thus 0.8 m x 2 m = 1.6 m2. To calculate the average cross-section of the stream at points AA and BB add the two cross-section values you found and divide by 2. Example Cross-section at point AA = 2.0 m2 Cross-section at point BB = 1.6 m2 Total (AA + BB) = 3.6 m2 Average cross-section = 3.6 m2 � 2 = 1.8 m2. Find the average water velocity Now you must find the average water velocity using a float as described in previous section 3.3. Have a friend put the float in the middle of the stream, a few metres upstream from line AA, and release it gently into the current. Stand at line BB and, using a watch, measure exactly the time (in seconds) it takes the float to travel the distance from AA to BB. Repeat the measurement at least three times and calculate the average time by adding all the measurements and dividing by the number of measurements you have taken. Now divide the distance from AA to BB by the average time to find the surface velocity of the water, and multiply this by 0.85 (a correction factor) to estimate the average water velocity. Example Distance AA to BB = 20 m; your three time measurements are 59, 61 and 60 seconds; their sum is 180 seconds: the average time to travel from AA to BB is 180 � 3 = 60 seconds; surface water velocity is 20 m � 60 s = 0.33 m/s; average water velocity is 0.33m/s x 0.85 = 0.27 m/s. Calculate the water flow To calculate the water flow (in m3/s) multiply the average water velocity by the average cross-section. Example Average water velocity 0.27 m/s; Average cross section 1.8 m2 ; Water flow = 0.27 m/s x 1.8 m2 = 0.486 m3/s To express this water flow in litres per second (l/s), multiply the result (in m3/s) by 1000. Example 0.486 m3/s x 1 000 = 486 l/s. Note: you can increase the accuracy of this method if you increase the distance from A to B to 30 m, 50 m or even 100 m. A greater distance between A and B is especially recommended if the stream is fast flowing. The faster the water flow, the greater the distance should be. Note: you can also increase the accuracy of this method if you increase the number of time measurements to 5, 7 or even 10. But remember... The longer the time measurement, the less the number of measurements required; The longer the time measurement, the greater the difference between each figure will be. Example Distance from AA to BB = 20 m. You have released the float five times and have measured the time it takes to travel from AA to BB as 50, 47, 51, 48 and 54 seconds. The average floating time is 50 + 47 + 51 + 48 + 54 =(250 � 5) = 50 s. Surface water velocity = 20 m � 50 s or 0.4 m/s. Average water velocity = 0.4 m/s x 0.85 (correction factor) = 0.34 m/s. Remember to adapt your calculations accordingly. 3.5 Dye stain and cross-section method This is a method for measuring small and large water flow with medium accuracy. In this method, water-staining dye is used instead of a float to measure the water flow. Measure the time (t1, in seconds) it takes for the front of the dye stain to reach line BB. Drop a small amount of dye in the middle of the stream a little above line AA. This will form a dye stain in the water. Note: potassium permanganate and fluorescein are suitable dye solutions that may be available from chemical suppliers. Measure the time (t2, in seconds) it takes for the end of the dye stain to reach line BB. Calculate the average time it takes the front and back of the dye stain to reach line BB by adding t1 and t2 and dividing the result by 2. Example Time for front of dye stain (t1) to reach line BB = 95 seconds Time for end of dye stain (t2) to reach line BB =105 seconds Total time: 95 + 105 = 200 seconds. Average time: 200 � 2 =100 seconds. Calculate the water velocity (in m/s) by dividing the distance from AA to BB (in m) by the average time (in s). Note: when you use a dye stain you do not have to multiply the water velocity by a correction factor as you do when using a float. Example Length of AA to BB = 20 m. Average time = 100 s. Water velocity = 20 m � 100 s = 0.2 m/s Calculate the average cross-section of the stream as described in section 3.4. Example Average cross-section = 1.8 m2. The water flow equals the water velocity multiplied by the average cross-section. Example Water velocity = 0.2 m/s Average cross-section = 1.8 m2 Water flow = 0.2 m/s x 1.8 m2 = 0.36 m3/s or 0.36 m3/s x 1 000 = 360 l/s Note: you can increase the accuracy of this method if you increase the distance from AA to BB or increase the number of time measurements as described in the previons section. Remember to adapt your calculations accordingly. 3.6 Weir methods Weirs are commonly used to measure small and large water flow with high accuracy. They are especially useful for recording water flow over a period of time. What is a weir? A weir is an obstruction placed across a stream that forces all the water to flow through a notch in the weir. There are weirs of many types and designs. In this section we will discuss two types, the triangular weir and the rectangular weir. In both the triangular and the rectangular weir the notch used has sharp edges so the water flowing over the weir will touch only a fine line and the notch width is smaller than the stream width (contracted weir). When a weir is in place across the stream it raises the upstream water level. To be efficient, a weir should create a sufficient vertical drop between the notch bottom and the downstream water surface. In such a case, the water will fall free, and air can circulate beneath the water as it overflows. The crest of a weir is the bottom edge of the weir notch. In a rectangular weir the crest length is the width of the notch. In a triangular (or V-notch) weir the crest length is zero. The head of the weir is the vertical distance from the weir crest to the undisturbed upstream water surface. Advantages and disadvantages of weirs Advantages: They allow for easy and accurate flow measurement; They are easy to build and require only little maintenance; small, floating debris will easily pass through the notch; They are durable. Disadvantages: They require considerable head-loss for proper operation; Large pieces of floating debris can become caught in the notch and change the water flow; Changes in flow can occur, for example, if debris becomes caught in the weir, silt builds up behind the weir, etc. Where to install a weir A weir should be installed in a channel that, upstream from the weir, is straight for a minimum distance at least 10 times greater than the length of the weir crest. To increase accuracy, place the weir at the lower end of a long pool sufficiently wide and deep for the water flow to approach the weir slowly, regularly and without any eddies. The water velocity immediately upstream from the weir should not exceed 0.14 m/s. Place the weir where the upstream water level (behind the weir) will not cause abnormal water losses by flooding the banks next to the stream, or water infiltration loss into the upper soil of the stream banks, which were not under water before. You must be particularly careful in flat countryside or where there are channels or ditches next to the stream that will be below the new water level behind the weir. How to choose a suitable weir First estimate the stream flow by using the float and cross-section method described in Section 34. Use a triangular weir if the stream flow to be measured: Does not vary greatly from season to season and is generally smaller than 114 l/s; Does vary greatly from small to large flow or large to small flow. Use a rectangular weir if the stream flow to be measured: Does not vary greatly, and is generally greater than 114 l/s. How to design a triangular weir A triangular weir or V-notch weir has a notch that is a right or 90� angle. Both edges of the notch must be sharp and no more than 3 mm thick. To obtain accurate water flow measurements with a triangular weir, be sure that: The water head is greater than 5 cm; The crest height, above the stream bottom upstream from the weir, is greater than two to three times the head; The water drop behind the weir is high enough to create a sufficient vertical drop so the water will fall free. Note: before you begin to build the weir, plan carefully in order to meet the above requirements of head, crest height and water drop. Be particularly careful about the stream width (if possible more than seven times the maximum water head) and the depth of the stream where you plan to install the weir. After the weir is built it will be difficult to change it. When you estimate water flow using a triangular weir, the error will tend to increase as the head decreases. Under field conditions, if you have fulfilled the requirements listed, the error will generally be limited to 10 percent. In a triangular weir, if you want to decrease the error further you can increase the notch depth, within the limits stated above, which will increase the head. The following notch depths (in cm) are required for the sizes of water flow (in l/s) shown: 20 cm, flow less than 15 l/s; 30 cm, flow 15 to 45 l/s; 40 cm, flow 45 to 65 l/s; 50 cm, flow 65 to 110 l/s. If the water flow is more than the largest water flow figure shown above (110 I/s) you will have to approximate the required notch depth. Using Table 4, find the head (in cm) corresponding to the maximum water flow (in I/s) to be measured and add about 10 cm to the head value to obtain the corrected notch depth. Water flow to measure (l/s) Corresponding head (cm) Required notch depth (cm) 180 44.5+10 55 260 51.5+10 62 390 60.5+10 71 How to design a rectangular weir The type of rectangular weir discussed in this section has a rectangular notch with a crest length that is less than the width of the stream. All three edges of the notch must be sharp and no more than 3 mm thick. To obtain accurate water flow measurements with a rectangular weir, be sure that: The water head is greater than 5 cm; The crest length is at least 15 cm and should, preferably, be greater than three times the maximum water head to be measured; The crest height above the stream bottom upstream from the weir is greater than two to three times the head; The distance from the sides of the notch to the sides of the stream channel should be greater than two times the maximum water head to be measured; The water drop behind the weir is high enough so the water will fall free. Note: before you begin to build the weir, plan carefully in order to meet the above requirements of head, crest height and water drop. Be particularly careful about the stream width (if possible more than seven times the maximum water head) and the depth of the stream where you plan to install the weir. After the weir is built it will be difficult to change it. When you estimate water flow using a rectangular weir, the error will tend to increase as the head decreases. Under field conditions, if you have fulfilled the requirements listed, the error will generally be limited to 10 percent. In a rectangular weir, if you want to further decrease the error you can reduce the crest length, within the limits stated above which will increase the head. Table 5 may help you to do this. The following notch depths and crest lengths (in cm) are required for the water flow range values shown: 30 x 60 cm, flow 80 to 120 l/s; 40 x 90 cm, flow 120 to 300 l/s; 55 x 120 cm, flow 300 to 600 l/s; 75 x 180 cm, flow 600 to 1500 l/s. To define notch dimensions for a rectangular weir other than those shown above, you can use the white upper part of Table 5. Locate the maximum water flow (in l/s) to be measured, keeping the crest length (in cm) as small as possible. Read horizontally the corresponding head (in cm) and add 10 to 15 cm to find the notch depth you should use. Example The maximum water flow to be measured is 250 l/s. Using Table 5 you find that 253.97 l/s is the closest to 250 l/s in the most accurate, or upper, part of the table, and with the smallest crest length = 90 cm. This water flow value corresponds to a head value of 30 cm. Then the notch depth should be 30 cm + 10 cm = 40 cm. The notch size you should use is 40 cm (depth) x 90 cm (width). How to build and install a weir How you build and install a weir will depend on the speed of the water flow and the size of the stream. In a flowing stream If there is a slow water flow or the stream is small, you may choose to build the weir on the bank, where it is dry and easier to work, and install the weir in the flowing stream after it is finished. With a very small stream, a weir that has been built on the bank can be installed by pounding it into place or digging it into the sides and bottom of the stream while the water is flowing. Note: if there is a fast water flow or the stream is large, you may choose to build the weir in place in the stream. The larger the stream, the larger the weir will have to be; it may turn out to be too large and heavy to build it on the bank and place it in the stream after it is finished. By diverting the water When the stream is large and you must build the weir in place, you will have to divert the water from the stream channel around the place where you will put the weir while you are building it. To divert the water, dig a ditch from a point in the stream bank upstream from the place you will put the weir to a point in the stream bank below the weir. Build a barrage just below the upstream end of the diversion ditch. When the water backs up behind the barrage it will flow through the ditch, around the site and back to the stream. To prevent the water diverted downstream from flowing back into the site you may have to build another barrage below the weir. When the water has been diverted and the site is dry, you can begin to build the weir in place. After the weir is finished, remove the barrages and let the water back in the stream channel. It will soon reach its constant level and begin to flow through the notch. Position of the weir in a stream A weir must be placed or built in the stream in a vertical position and on a line across the stream perpendicular to the water flow. Mark the position you have chosen for the weir by stretching a line across the stream from bank to bank at a right (90�) angle to the water flow. Drive a row of strong wood stakes into the stream bed along the line. Use a level to make sure the stakes are vertical. This row of stakes will help you to position the weir properly, whether it has been built on the bank before installation or built in place in the stream. When you are installing a weir that has either been built on the bank, or is being built in place in the stream where the water has not been diverted, position the weir on the upstream side of the vertical stakes so that the flow of the water holds the weir in the correct position against the stakes. After the weir has been well installed in the banks and bottom of the stream, you can remove the vertical stakes if the weir needs no additional bracing. If the water flow is strong and additional bracing is needed, remove only the stakes behind the notch. Building a weir of wood You can build a weir of close-fitting wood boards or planks held together by upright pieces of wood on both sides. The thickness of the wood you should use will depend on the width of the stream and the force of the water flow. For a very small stream you can use light wood, but for a large and fast stream you will need to use heavy wood or timber. Measure the width of the stream and the distance from the tops of the bank to the stream bed to find out what size of weir you must build. A weir must be built high enough and wide enough so that it can be driven well into the stream banks and bottom to give the necessary support and to prevent water leakage around the sides and under the weir. Build the weir in such a way that there is enough space in the centre between the uprights for the size of notch you will need. Cover the joints between the wood boards or planks with strips of wood to prevent water leakage. After the weir has been built, you are ready to cut the notch in the upper edge. Triangular weir How to construct a 90� triangular notch in wood: Find the centre point on the top edge of the weir; On each side of the centre point, measure and mark a distance equal to the depth of the notch (say 30 cm) you will use; At the centre point, draw a right angle line downwards, equal in length to the depth of the notch; Connect the end of this line with the two marks on the top edge of the weir. You have constructed a right angle (90�) triangular notch; Using a wood saw, carefully cut out the notch; Check the notch you have cut with a square to see that it has a 90� opening and that all other measurements are exact; If necessary, strengthen the boards or planks you have cut. Do this with wood bracing on the downstream side of the weir; File both sides of the notch to an angle with a sharp edge of no more than 3 mm on the upstream side of the weir. Rectangular weir How to construct a rectangular notch in wood: Find the centre point on the top edge of the weir; On each side of the centre point, measure and mark a distance equal to half of the crest length, say 30 cm (crest length 60 cm), you will use; At each of these two marks, draw a right angle line downwards equal in length to the depth of the notch; Connect the ends of these two lines. You have constructed a rectangular notch; Using a wood saw, carefully cut out the notch; Check the notch you have cut with a square and a mason's level to see that the crest edge is at a 90� angle to the sides and that all the other measurements are exact; If necessary, strengthen the boards or planks you have cut. Do this with wood bracing on the downstream side of the weir; File all sides of the notch to an angle with a sharp edge of no more than 3 mm on the upstream side of the weir. When the weir is in position in the stream and has been well built into the banks and stream bottom, make sure it is watertight. Pack the joints between the boards with moss, clay or greasy cotton waste. Fill all the holes along the bottom and sides of the weir by packing them with clay, sod or turf. Building a weir with other materials You can also build a weir with sheet metal or corrugated roof sheeting. Sheet metal The thickness and strength of the sheet metal you will have to use will depend on the speed of the water flow and the size of the stream. When you cut a notch in sheet metal be careful that the edges are straight and sharp. You might ask the local blacksmith to help. Note: if a weir made of sheet metal needs additional bracing, leave the vertical stakes you have put in the stream to mark the position of the weir, but be sure to remove those stakes in front of the notch. Corrugated roof sheeting Corrugated sheeting is usually easy to find in large sheets and much less expensive than sheet metal. Corrugated sheets have the disadvantage of bending along the corrugations. If the corrugations are placed across the stream and the weir is well built into the banks and stream bottom, the sheet will be quite strong. A notch cut in a corrugated sheet will be irregular and will give a less accurate result. To avoid this, fit a section of wood into the centre of the sheet and cut the notch in this as described earlier for a regular wood weir. Note: if a weir made of corrugated sheeting needs additional bracing, leave the vertical stakes you have put in the stream to mark the position of the weir, but be sure to remove those stakes in front of the notch. For accurate measurement it is essential that your weir: Be built at a right angle (90�) to the direction of the water flow; Be placed exactly vertical at a 90� angle to the surface of the water. While you are installing a weir or building a weir in place, check this regularly. Using a weir to determine water flow A weir is used to determine water flow by measuring the head, or the difference between the level of the crest of the weir and the water level upstream from the weir. The level of the water actually passing over the crest of the weir will not be as high as the water level upstream because, as water flows closer to the weir, the level begins to drop before it flows over the crest. To measure the head, or the constant upstream water level equivalent at the weir, you will have to transfer a point equal to the crest height at the weir to another point upstream where the water level will be constant. Find the upstream point by measuring a distance above the weir that is a least 10 times the depth of the weir notch. Preparing an upstream point to measure the head when you have diverted the water flow If you have diverted the water from the channel to build the weir it will be easier to prepare this upstream point. Drive a stake into the stream bottom near the bank at the upstream point you have selected. Use a mason's level and straight board and transfer the height of the weir crest to the stake. Continue to drive the stake down until the top is at the same height as the weir crest. Now let the water flow back into the channel. Be sure to close the diversion ditch so that when the level rises behind the weir no water will be lost in channels or ditches or by infiltrating or flooding (see p. 63). When the constant upstream level has been reached, the top of the stake will be under water. Check to see that the weir is built properly and all requirements have been met. either for the triangular weir; or for the rectangular weir. Find the head by placing a measuring stick, with the zero mark at the bottom, on top of the stake and reading the depth figure at the surface of the water. Preparing an upstream point to measure the head when you have not diverted the water flow If you have not diverted the water from the channel to build the weir, you will have to prepare this upstream point while the water is in the channel. Drive a stake into the stream bottom near the bank at the upstream point you have selected. The stake should be tall enough to remain above the surface when the level of the water reaches its maximum height. Hold a measuring stick, with the zero mark at the bottom, in the weir notch. The length of the measuring stick should be a bit longer than the notch is deep. Using a mason's level and straight board, transfer the height of the top of the measuring stick to the stake and mark it. Remove the measuring stick from the notch, place it beside the stake and tie the top of it to the stake, even with this mark. Check to see that the weir is built properly and all requirements have been met, either for the triangular weir or for the rectangular weir. Find the head by reading the depth figure on the measuring stick at the surface of the water. We have seen previously that triangular weirs are generally used for measuring small water flows while rectangular weirs are used for measuring large water flows. For this reason, measure the head in a triangular weir with a measuring stick graduated in half -centimetres and the head in a rectangular weir with a measuring stick graduated in centimetres. Note: when you are measuring the head at the upstream point, be careful not to disturb the water surface (by standing in the water, for example), which may make the head reading inaccurate. Maintaining a weir To insure accurate water flow estimates using a weir you must maintain it regularly: Clean the weir and remove floating debris caught in the notch; Remove any silt that builds up on the upstream side of the weir; Control the erosion of the stream bottom on the downstream side of the weir; Check the alignment of the weir, both vertical (from the surface of the water) and perpendicular to the flow of the water; Check that the weir is watertight; Check that the zero mark on the upstream measuring stick is equal to the weir crest. How to calculate water flows using a weir Triangular weir When you use a triangular weir, measure the head value (to the nearest half -centimetre) on the upstream measuring point. When you have found the head value, use Table 4 and find the water flow (in l/s). Examples The constant water level at the upstream measuring point is closest to 23.5 cm; this is the head value on the weir. Using Table 4, you find that, for a head value of 23.5 cm, the water flow = 36.68 l/s. The constant water level at the upstream measuring point is closest to 34 cm; this is the head value on the weir. Using Table 4, you find that, for a head value of 34 cm, the water flow = 92.35 l/s. Note: remember that triangular weirs are best suited to measuring water flows of 114 l/s or smaller. When using Table 4, all values higher than F = 114.08 l/s and H =37 cm will become less and less accurate as H and F increase above these values. TABLE 4 Water flow estimates using a triangular or V-notch weir (H = Head in centimetres; F = Water flow in litres per second) NOTE: The grey section is less accurate. Rectangular weir When you use a rectangular weir, measure the head value (to the nearest centimetre) on the upstream measuring point. When you have found the head value, use Table 5 and, in the column corresponding to the weir crest length, find the water flow (in l/s). Example The crest length of your weir is 30 cm and you have found that the head value is 10 cm; find this last value on the left scale of the table and follow the line across until you reach the crest length column for 30 cm (note that this is still in the upper section of the table where water flow values are most accurate); you find that the water flow value is 16.29 l/s. If you find in-between or odd-number head values, you will have to approximate to find the correct water flow value. Only even-number head values are shown in Table 5. Example Your crest length is 60 cm and you have measured a head value (H) that is closest to 15 cm. To approximate the water flow for a 15-cm head you must average the difference between the water flow values (F found in Table 5 for H = 14 cm and H = 16 cm); for H = 16 cm, F = 66.89 l/s and for H = 14 cm, F = 55.13 l/s. Adding these two F-values and dividing the result by two: 66.89 + 55.13 = 122.02 � 2 = 61.01 l/s or say 61 l/s which is the corrected water flow value for a 15-cm head. If the crest length of your weir is greater than 30 cm and is not listed in Table 5 (e.g., 40, 50, 70 and 80 cm), you can calculate the water flow value by using the 10-cm column, at the right of the table, and by following the steps as in the next example below. Find the head value in the right-hand column of the table. Find both the water flow value shown in the column where the crest length is smaller than the actual crest length of the weir you are using and the water flow value in the 10-cm column. Calculate the number of additional 10-cm lengths the actual weir crest has, compared with the smaller crest length you have found in the table. Now multiply the water flow value found in the 10-cm column by this number and add the result to the water flow value corresponding to the smaller crest length. The result is the corrected water flow value for the actual crest lengt. Example Your actual crest length is 110 cm and you have measured a head value that is closest to 34 cm. The column where the crest length is smaller than 110 cm is 90 cm, with a water flow value of 303.50 l/s. Following the same line, the water flow value in the 10-cm column is 34.40 l/s. The difference between the actual crest length and the crest length in the table is 110 cm - 90 cm = 20 cm. The number of additional 10-cm lengths is 20 � 10 = 2. Then the additional flow due to this is 34.40 x 2 = 68.80 l/s. The correct water flow value for the actual crest length of 110 cm is 303.50 l/s + 68.80 l/s = 372.30 l/s. If you are measuring a water flow that is 130 l/s or less,you can use Table 6. Do this by finding the head (in cm) on the left scale of the table and follow this value horizontally across until you reach the curve that represents the correct crest length. Bring this point vertically down to the bottom scale and read there the water flow (in l/s). Example The crest length of your weir is 50 cm and you have found that the head value is 15 cm; find the head on the left scale of the table and follow the horizontal line across until you reach the curve for a crest length of 50 cm; from this point follow vertically down to the bottom scale of the table. You will find that the water flow is about 51 l/s. TABLE 5 Water flow estimates (in l/s) using a rectangular weir1 NOTE: The accuracy of the water flow values decreases when head values are greater than one third of the crest length. Water values in this table are divided into three sections: white, darker and lighter grey. The values in the white section are the most accurate. In the other two sections, the accuracy decreases as the head increases toward a value equal to the crest length. 1With full end contractions and sharp edges. 2Approximate water flow for each additional 10 cm of weir crest (for crest lengths of 30 cm or longer and for values in the unshaded upper part of the table only). TABLE 6 Water flow estimates (in l/s) using a rectangular weir1 1With full end contractions and sharp edges 3.7 Water flow through a straight pipe This is a method to estimate water flow through a relatively short, straight pipe, from a higher level to a lower level, and can be used, for example, when you fill or empty a pond. To use this method you will have to find the head (in cm). If water flowing from a higher level to a lower level flows out of the pipe above the water line of the lower level, you can find the head by measuring the vertical distance (C.L) between the surface of the water above and the centre line of the pipe below. If water flowing from a higher level to a lower level flows out of the pipe below the water line of the lower level, you can find the head by measuring the vertical distance between the surface of the water above and the surface of the water below. To find the head, first prepare a constant point to measure from. You can do this by using a mason's level and a straight board, or a line level and a string tied between two stakes. Place a straight board on the top of the bank. Make sure it is horizontal by using a mason's level. If the board is not horizontal, prop it up with stones until it is. Find the head by measuring downwards on both sides of the bank and taking the difference between the two measurements. Example For a pipe above water line, measure the distance from the horizontal to the surface of the water (AB) on the upper level; measure the distance from the horizontal to the centre line of the pipe (CD) on the lower level; the head is CD-AB. Another way to find the head is to drive a stake into the bank on each side. Put the stakes in the water a little out from the edge of the bank. Using a line level, tie a string between the two stakes in a horizontal position. Find the head by measuring downwards on both sides of the bank and taking the difference between the two measurements. Example For a pipe below water line, measure the distance from the horizontal to the surface of the water (AB) on the upper level; measure the distance from the horizontal to the surface of the water (CD) on the lower level; the head is CD-AB. When you have found the head value, find the water flow using Table 7 for pipes with an inside diameter smaller than 9 cm, or Table 8 for pipes with an inside diameter larger than 9 cm. Do this by finding the head value (in cm) on the vertical scale of the table and follow horizontally across until you reach the curve that marks the size of pipe you are using. Now look down to the bottom scale where you can read off the water flow (in l/s). Examples Your pipe has an inside diameter of approximately 7.6 cm; you have found that the head value is 18 cm; find this value on the left scale of Table 7 (diameter smaller than 9 cm) and follow across until you reach the curve for a 7.6-cm pipe; follow vertically down to the bottom scale, where you find that the water flow is 6.5 l/s. Your pipe inside diameter is about 25.4 cm and the head value is 19.5 cm; find this value on the left scale of Table 8 (diameter greater than 9 cm) and follow across until you reach the curve for a 25.4-cm pipe; follow vertically down to the bottom scale, where you find that the water flow is about 76 l/s. TABLE 7 Water flow estimates through straight pipes with an inside diameter smaller than 9 cm TABLE 8 Water flow estimates through straight pipes with an inside diameter larger than 9 cm 3.8 Water flow through a siphon This is a method to estimate water flow through a relatively short, curved tube called a siphon, from an upper level to a lower level, and can be used, for example, when you fill or empty a pond. As with the pipe method just described, to use this method you will need to calculate the head (in cm). How to make a siphon A siphon can be made from a length of rubber or plastic tube that is long enough and pliable enough to reach over the bank from the upper water level to the lower water level. How a siphon functions A siphon will function only when there is a difference in the two water levels and the end of the tube at the lower level is below the end of the tube immersed in the water at the upper level. Measure the head, the difference between the surface of the water on the upper level and the surface of the water on the lower level, by using a mason's level and a straight board, or a line level and a string tied between two stakes, as shown in the previous section. Example Measure the distance from the horizontal to the surface of the water (AB) on the upper level; measure the distance from the horizontal to the surface of the water (CD) on the lower level; the head is the difference between the two, or CD-AB. When you have found the head value, find the water flow using Table 9 for siphons with an inside diameter smaller than 9 cm, or Table 10 for siphons with an inside diameter larger than 9 cm. Do this by finding the head value (in cm) on the vertical scale of the table and follow horizontally across until you reach the curve that marks the correct size of siphon. Now look down to the bottom scale where you can read off the water flow (in l/s). Example Your siphon has an inside diameter of approximately 5.1 cm; you have found that the head value is 21 cm; find this point on the left of the table and follow horizontally across until you reach the curve for a 5.1-cm siphon; follow vertically down to the bottom scale where you find that the water flow is about 2.5 l/s. TABLE 9 Water flow estimates through siphons with an inside diameter smaller than 9 cm TABLE 10 Water flow estimates through siphons with an inside diameter larger than 9 cm
To divert the water, dig a ditch from a point in the stream bank upstream from the place you will put the weir to a point in the stream bank below the weir.
Corrugated sheets have the disadvantage of bending along the corrugations. If the corrugations are placed across the stream and the weir is well built into the banks and stream bottom, the sheet will be quite strong.


 8615510865705
 8615510865705